For the Lord God is a sun and shield; the Lord bestows grace and favor and glory - honor, splendor and heavenly bliss! No good thing will He withhold from those who walk uprightly.

Psalms 84:11
Showing posts with label Fresh From My Garden. Show all posts

Monday, October 5, 2009

Stuffed Patty Pan Squash - Fresh From My Garden


This was a total improvise, so I was really excited when it turned out to be so good! But with these ingredients how could you go wrong? Bacon, onions, mushrooms and cheese doesn't make this a light recipe, but a delicious way to use any patty pan squash you have hanging around.

What? Never had patty pan squash? It's a bit sweeter than zucchini, cooks up nice and firm so excellent for stir fry or sautee. My mom likes them best sauteed with garlic and olive oil, and I can't say I blame her. But if you wanna do something a bit more fancy you could give this a try. :)

Stuffed Patty Pan Squash

6 patty pan squash
1/2 pound of bacon
1/2 an onion, diced
1 tomato
1/2 pound of sliced mushrooms
1/2 cup Italian bread crumbs
1/2 cup of cheddar
1/2 cup of parmesan cheese
1/2 teaspoon of pepper
1/2 teaspoon of salt

Carve the tops off the squash and scoop out the seeds with a teaspoon or melon baller. Set aside.

Brown the bacon, allow to drain on paper towels. Drain all but 2 teaspoons of bacon grease. Add the onion to the hot skillet, cook until soft and it has taken on some color from the bacon grease. Add the tomato and mushrooms, saute until veggies are soft. Set aside to cool.

In a medium bowl combine bread crumbs, cheeses and seasonings. Add crumbled bacon and vegetables. Stir well to combine. Stuff mixture inside hollowed squash. Return tops of squash to the top of each one. Spray a baking dish with cooking spray and place squash inside. Cover loosely with foil and bake at 350 degrees for 20-30 minutes. You want the cheese to be bubbly, the squash should be firm but hot.

Monday, September 28, 2009

How To Make Traditional Bread & Butter Pickles - Mystery Spice Monday

Canning.

It's what I've been doing all summer while not attending to my blog.

I've learned a lot! I've learned that when you overfill canning jars they erupt in your canner and then you have a mess plus not enough liquid in your jars. I've learned that I should definitely plant less cucumbers next year. And as a result, I could make bread & butter pickles in my sleep.

And they are soooo good! WAY better than dill or sweet in my opinion.

And I now have enough to give them away plus have plenty for myself.

YUM!

Oh, and since I thought you'd be interested, here's a bunch of stuff I picked which necessitated the making of pickles:


Yup, that's bunch of tomatoes, a zucchini, and 6 cucumbers. And believe it or not, my cucumbers are slowing down. In previous weeks I'd pick 8-13 cucumbers in a day and 4-6 zucchini.

Now you know why I haven't been around!

So lets get down to business with the cucs shall we?

Slice approximately 7 cups of cucumbers and 4 onions and place them in the largest bowl you own.


Cover them with 1/2 a cup of canning and pickling salt. This is important, regular salt won't dissolve properly.


Cover completely with water and let it soak for at least 2 hours. While they are soaking you can prepare your canning jars, rings and lids. This will make 5-7 pint size jars so I usually prepare 8 just in case.


Once the soaking is done rinse completely. I rinse mine in small sized batches to make sure I get all the salt water off.


Then I set up my stove. The small pot in the back has a little bit of water and lids set to low heat until simmering. The front left pot has 3 cups of white vinegar, 2 cups of sugar, 2 Tbs. of mustard seeds, 1 teaspoon of celery seed and 1 teaspoon of tumeric. Cook this until it comes to a boil and the sugar is disolved. On the right front burner is my steamer canner (it's the same as a water bath only it steams, you can use a regular water bath).

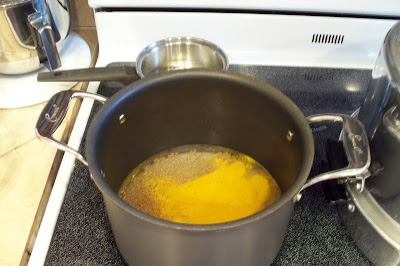


Once your pickling solution comes to a boil you can add your veggies. I do small batches at a time using veggies I've just rinsed.


Return them to a boil. Once it starts boiling they're done! Easy peasy!


Remove your pot of goodies from the heat and start filling jars with a slotted spoon.


As I do this I often stop and sort of gently bang the jars on the counter to shake them around a bit and get the veggies to compact.


When I'm done with a small batch my solution looks like this. And I put it back on the stove on med-high heat until it returns to a boil. Then I add more veggies, boil, fill jars, etc.


Once the veggies are all cooked and the jars are all filled I top them off with spoonfuls of pickling solution. You want to leave a generous 1/4 inch headspace.


Run a knife around the jars to release any air bubbles. Add more solution if needed.


Then a VERY important step! Take a wet rag and wipe the rims of the jars. If you don't, the lids won't seal and you will have done all that work for nothing.


You guessed it! Then you add the lids. I have a handly little magnetic lid lifter that came in a box of canning supplies. They're not necessary, you could just use tongs, but since I have it I'm using it.


Place the lids.


And then put the rings on. You want them to be "finger tight". My definition of that is only twist with the tips of your fingers, don't use your whole hand to get it as tight as possible. I do put them on tighter than my mom, she barely screws them on. The good news is that we both have successfully preserved food so I don't think it's that big of a deal.


Put the jars in your canner. Use manufacturers directions on whichever canner you have. Remember, canning is not just cooking, it's science. So it's important to follow the directions precisely.


For mine I need to wait until steam comes out of those little holes on the side before I start my processing time. And I never really knew how HARD it was to take a picture of steam! This was the best I could do. :P


Process them for 10 minutes, after that my canner needs to sit off the heat for 3 minutes. And then Voila! Preserved pickles!


Lift them out of the canner using that cool lifter tool from your canning supplies box.


Let them set for 24 hours, and delight in the music of popping lids! That's the sound that means "I'm sealed!".


After 24 hours, any lids that aren't sealed (you can test them by pushing in the middle of the lid, if it gives it isn't sealed) just toss them in the fridge and use them within the next week or two.

I know some of you said that you might participate this week in Mystery Spice Monday, and that's AWESOME! But I still haven't figured out how to do the new Mr. Linky (it's on the to do list!). So if you have a recipe to share please post your link in a comment and I will add a permanent link to the bottom of this post. Thanks for your understanding! :)

Monday, August 3, 2009

Chocolate Zucchini Bread - Fresh From My Garden

I know I promised some zucchini recipes a while back, and while I did post this recipe I kinda fell off the band waggon about posting others. So here's a great one I've been using for years now.

It came from this cook book:


I went to the Franciscan Montissori Earth School in Portland, OR when I was in grade school. So when my mom found this at a used book store, and then gave it to me for Christmas, I was VERY excited! Those years at the Earth school were such a magical time in my life. In fact, I seriously considered becoming Catholic just so I could become a Franciscan nun.

But I guess I just liked boys too much.


They live in Bridal Veil, OR which is about a 40-45 minute drive from Portland. And it's such a gorgeous setting it's really no wonder they're willing to commute such a distance. They actually have a water fall in their back yard!! How cool is that?!


Here is the little blurb about them from the book:

The acreage itself provides an environment in which to learn and grow. The land is a classroom for the Franciscan Montessori Earth School in Portland, Oregon, which fosters a creative learning environment for children pre-school through high school. Here the students are awakened to their responsibility to be stewards of the earth. In complement, the land provides a fertile centering for the Sisters' counseling program which incorporates the care of animals, the herb, vegetable and flower gardens as part of the therapeutic process.


Each chapter features a different convent from around the world. It's really pretty amazing to read about each of their missions and how they minister to different segments of society, yet have a common theme that binds them together, their love of Christ.

So onto the bread! I don't ever remember eating Franciscan zucchini bread, but I do remember eating other things that came from their kitchen and seriously, those ladies can COOK! So I knew any recipe that came out of this book would be a hit. This time I tweeked the recipe a bit to make it my own by adding cocoa powder and chocolate chips. I figured that pretty much anything is better with chocolate, and I was right!


First I took my shredded zucchini from the freezer. What? You don't freeze your zucchini?? You're missing out! It's super easy if you use a food processor or salad shooter, and then you can use it in all kinds of recipes year round.

Then you beat 3 eggs.


And add 2 cups of sugar.


And 1 cup of oil.


And 1 T of vanilla. Yup, it's more vanilla than the recipe calls for, but I like most recipes with some extra.


Then you add 1 cup of zucchini. I don't have a picture of that. Oops!

Then you mix up your dry ingredients. Here I have 1 1/2 cups of all purpose flour, 1 1/2 cups of whole wheat flour, 1 tsp. of salt, 1 tsp. of baking soda, 1 T of cinnamon, 1/4 t of baking powder.


And then I added 1/4 cup of cocoa powder.


Then I added a little at a time to the wet mixture and combined until smooth.


Then I added a cup of chocolate chips.


You can make 2 loaves with this batter, but I only made one.


And it was good!


Chocolate Zucchini Bread
Adapted from Franciscan Heritage Cookbook

3 eggs
2 cups sugar
1 cup oil
1 cup grated zucchini
1 T vanilla
3 cups flour (I used a combo of all purpose and whole wheat)
1 t salt
1 t baking soda
1 T cinnamon
1/4 t baking powder
1/4 cup cocoa powder
1 cup of chocolate chips

Beat eggs. Add sugar and oil, beat for 2 minutes. Add zucchini. Combine dry ingredients in a separate bowl and then mix with wet until it has a smooth consistency. Mix in chocolate chips. Pour into well greased and floured loaf pans. Bake at 325 degrees for one hour.

Monday, July 6, 2009

Fresh From My Garden - Zucchini Cookies

From what I gather, other people in other parts of the country have zucchini ready RIGHT NOW and are looking for something to do with their bountiful crop. Well, around here in the Pacific Northwest (aka Zucchini Country) we come up with lots of ideas on how to use them! We grill 'em, we chill 'em, we eat 'em raw with dip, and of course we shred 'em and bake 'em. That's how we roll.

Up until this year I have never grown a Zucchini. I know, I know, what kind of a Washingtonian am I?? An inundated Washingtonian that's who! Because everyone, and I mean EVERYONE seems to think I could use a few extra zucchini around. For the past 3 years I've had 2 excellent zucchini sources: the lady across the street, and my mom. Good bless them! The year the girls were born I had so many that you would have thought I had my own plant. That year a good friend of mine came over to see my new babies, picked up a gigantic 5 lbs. zucch and proclaimed, "It's a BOY!" Yup, it was even shaped like a baby! And to think I shredded that baby up and tossed him into my freezer.

Ah, here he is now! My how you've... not grown at all. (Nice segway, eh?)


This recipe came from Sunset Magazine, August 2006. It was in the section where readers send in their favorite summertime recipes. And I must bow my hat to Jacob Gross of Lompoc, CA. (Can you believe such a great zucchini recipe could come from anywhere other than the NW?! I can, my SIL makes a killer zucchini bread. KILLER!) Jacob, you have saved me from throwing Zucchini to the compost pile many a time. These cookies are delicious AND easy to make. So Thank You!

First you take 1 cup of room temp butter. I usually leave my sticks on the counter overnight to make sure they're REALLY room temp. Then add 1 1/2 cups of sugar.


Mixy mixy until creamed.


Then add 2 eggs. I'd really love to have chickens and farm fresh eggs someday, but Hubs is very opposed to that idea... so I guess not. I think I'd make a very good crazy chicken lady.


Bock bock bock! Er... I mean... 1 Tablespoon of vanilla. More than the original recipe but I really like vanilla.


Then you mix in 2 cups of shredded zucchini, I don't have a picture of that part. Oops! Cracks me up that I forgot to take a picture of THE KEY INGREDIENT!

This here is 2 3/4 cup of flour, 2 teaspoons of baking powder, 1 tablespoon cinnamon, 1 teaspoon salt.


Combine the dry into the wet and mix until it's all fluffy and pretty.


Then add 1 cup of nuts, I used pecans.


One cup shredded sweetened coconut.


One cup raisins.


And one cup chocolate chips.


Mix it all together, and refrigerate for at least an hour or until the batter firms. This step isn't in the original recipe, but I've found it's the secret to keeping these cookies from spreading out and hardening in the oven. Gotta get those fats solidified! Then I use a small ice cream scoop to make the cookies uniform for even baking.

And they come out like this!


Zucchini Cookies

1 cup butter, at room temp
1 1/2 cups sugar
2 large eggs
1 tablespoon of vanilla
2 cups shredded zucchini
2/3/4 cups all-purpose flour
2 teaspoons baking powder
1 tablespoon ground cinnamon
1 teaspoon salt
1 cup chopped pecans
1 cup semisweet chocolate chips
1 cup raisins
1 cup sweetened coconut

Preheat oven to 350 degrees. Cream together butter and sugar in a stand mixer until light and fluffy. Beat in the eggs and vanilla. Stir in zucchini. In a medium bowl mix all flour, baking powder, cinnamon and salt. Add to the zucchini mixture. Stir in nuts, chips, raisins and coconut. Refrigerate for at least 1 hour. Drop by tablespoonfuls onto lined cookie sheets. Bake until lightly browned, 15-20 minutes and transfer to a cooling rack.
Related Posts Widget for Blogs by LinkWithin